Pages in Documentation

Settings

UI3 Overview

[old] Doors UE5
Quick Guide 2026
Quick Start
Swap Actor
Custom Assets
System Drawings
Guide 2022
Tips & FAQ
Guide 2024
Fix Bugs

FAQ

Cost Tracking

Modes
Other Features
Designer

Edit Scene
Var Actor
UI Layout
New in 2026
Multi-Unit-Prj
Google Data Sheets
Data Tables
Video Guides

Quick Videos
Designer

Cost Tracking
Widget Panels
Quick Guide
Scene Settings
Connect BP

VR projects
Version History
F. w. Preview
Fix Known Bugs
UI Settings
UI Layout
Gamemode
FAQ + TIPS
V4 Functions 2
V4 Functions P1

V4 Quick Guide
Ver History
V3 Placements
V3 Mesh Def.
V3 Segments
V3 Quick Start
Books V2
Books V1
Customize
Quick Guide
Swap Actor
FAQ + TIPS
Doors UE4 (V1)

3.1 Bugs Fixes
Ver History
![[2 A] Generic Meshes On Spline Blueprint ../images/architecture/0023/v2-generic/thumbs/01.jpg](../images/architecture/0023/v2-generic/thumbs/01.jpg)
V2 Generic BP
![[2 B] Generic Spline Blueprint Examples ../images/architecture/0023/v2-examples/thumbs/01.jpg](../images/architecture/0023/v2-examples/thumbs/01.jpg)
V2 Examples
![[1] Railings Clone Blueprint Documentation ../images/architecture/0023/v1/thumbs/01.jpg](../images/architecture/0023/v1/thumbs/01.jpg)
V1 Railings Fences

UI 1 - Part 1
UI 1

Ui 1 - Part 2

1 Overview
UI2 Features
UI2 Get Started
UI2 Info Map
UI2 BP Actors
UI2 User Manager
UI2 FAQ
UI2 Tutorials

UI3 Overview
Getting Started

3.1 Info Map
Variation Actor
Blueprints
[2 B] Generic Spline Blueprint Examples
Practical Examples for the use of the generic spline blueprint (BP_GenericMeshesOnSpline)

Content:
Example 1: Kerb For A Small Zen Garden
Example 1: Kerb For A Small Zen Garden
In this example a 20cm kerb is repeated on a spline to frame grass patches in a interior zen garden. This is the most basic type of use for the generic spline actor. Most settings are default settings. Only the mesh needs to be replaced.
Watch the video at the end of this example.
The scene and meshes are not included.

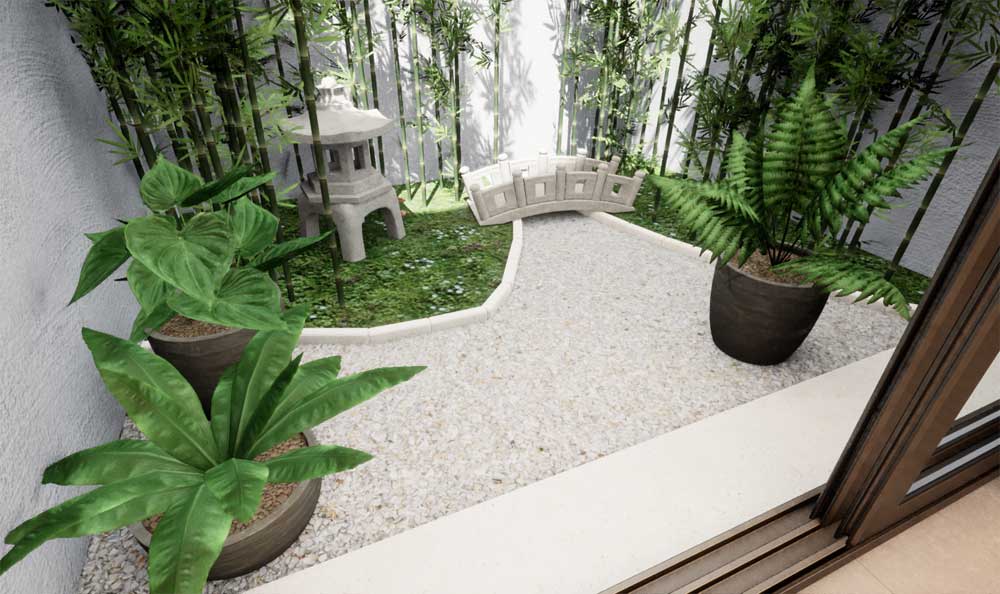
Static Mesh Module
Mesh is not included!
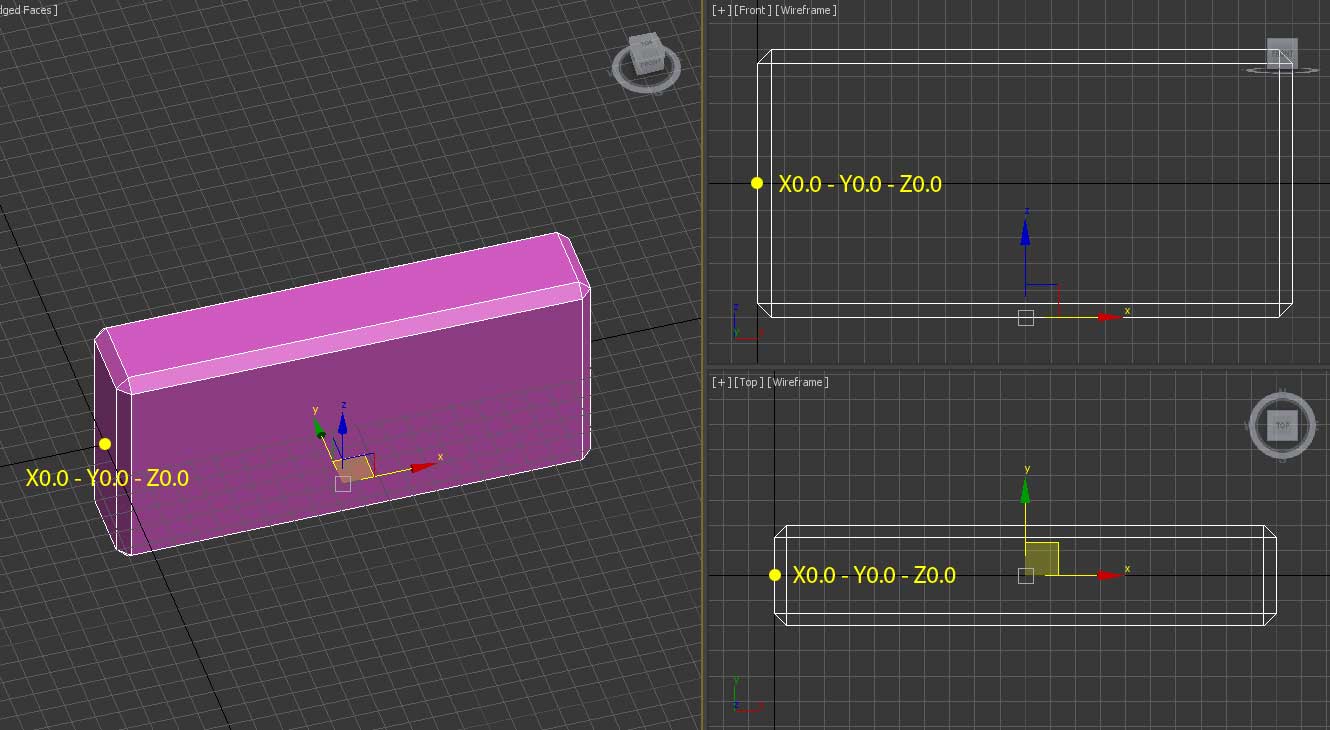
Create a box 20x10x4 units (cm) large and chamfer it with 0.5 units all around. Place it onto the origin (0-0-0) of your modelling program extending to the X-Axis. This is the native orientation for spline meshes in Unreal.
I box-mapped it with X-Y-Z the same size. I always use the same box mapping so single id materials can be used on all box mapped meshes.
Once imported I add a box simplified collision to it. To avoid scaling problems you can convert the collision box to convex (optional).
I also created a 2nd UV in the editor from the first one for the lightmap. I used 24 as the lightmap size.
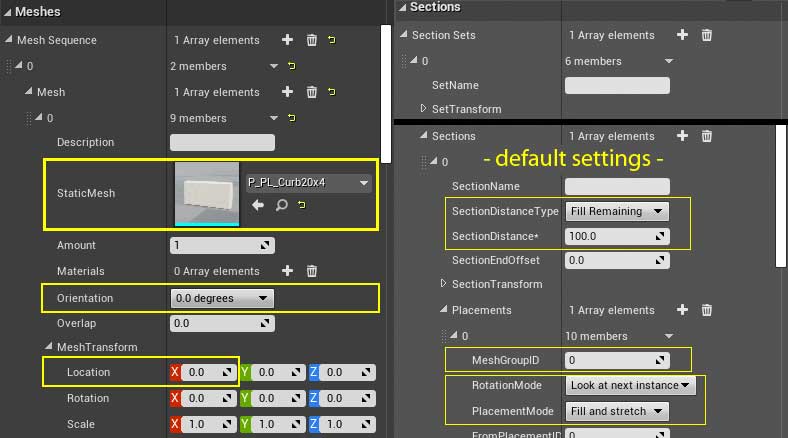
Spline Blueprint
Place the blueprint BP_GenericMeshesOnSpline into the map. It will have the default railing mesh on it. In the Meshes section replace the railing mesh with the new kerb mesh. That's all you have to do for a simple example like this before you can lay out the spline.
Use the 'Orientation' if a mesh happens to point into the wrong direction.
A mesh may not orientate from one side but from the middle. You can compensate this with the MeshTransform Location in the Mesh section. Use X to move the mesh along the spline. Y will move it off the spline and Z will alter its height position.
Video Tutorial
Watch a 4 minute video recorded while I was creating the garden kerbs.
Example 2: Decorative Wood Slats
In this example I use the GenericMeshOnSpline blueprint to add decorative vertical wood slats. A common element in architecture.
This example uses 2 sections and 2 meshes. The end section will have a single slat while the main section uses a modular slat set with the background black wall strip attached.
This scene is from a different project that is not included in the marketplace package.
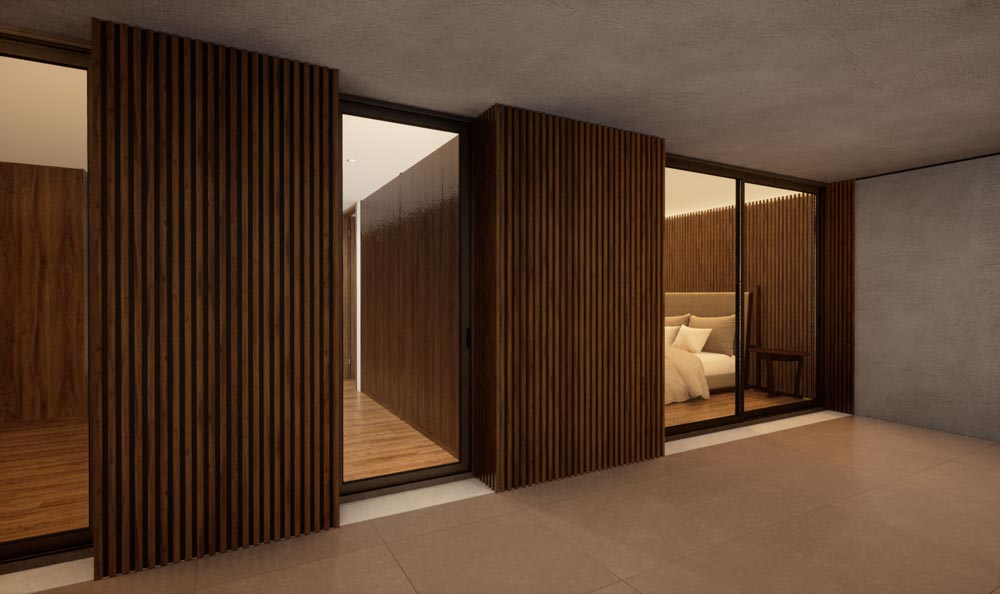
Static Mesh
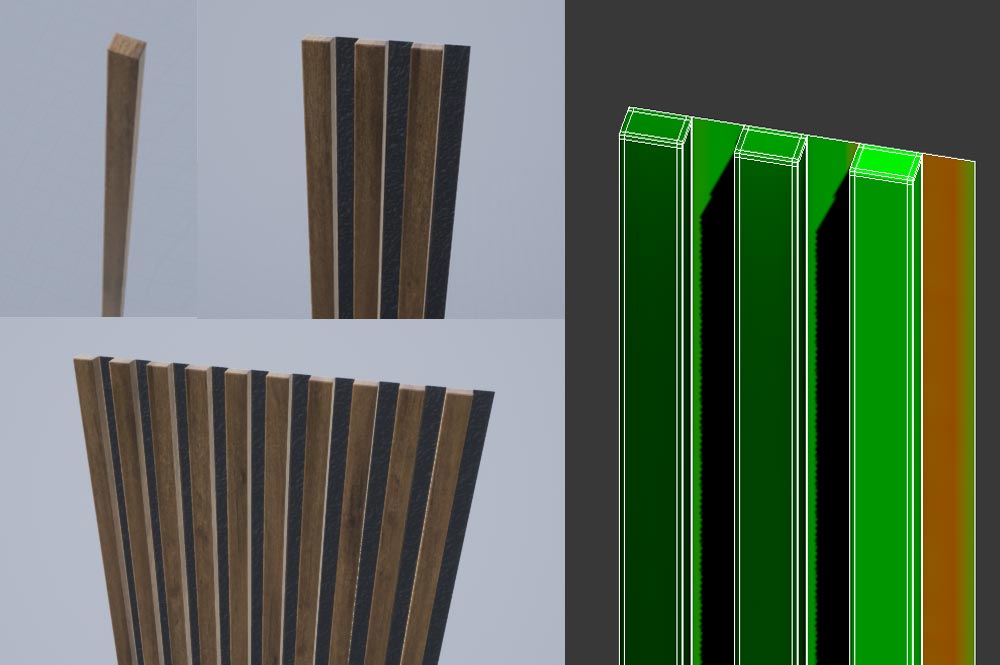
On the right is a close up of the slats in the modelling program. I baked the meshes but that's optional.
On the left side are the 3 meshes used:
- A single slat for the end
- A 3 slats modular mesh
- A 10 slats modular mesh
Don't forget to place the left side of the mesh onto the origin point 0,0,0 in your modelling program.
the scene and meshes are not included.
Meshes Settings
The mesh sequences are still just a single mesh. But this time we need two different meshes. Because they don't alternate along the spline 0-1-0-1-0-1 we need to set them in separate mesh sequences. We need them to be placed on the spline as 0-0-0-0-0-0-1. This will be done in the section.
Both meshes are made for splines and don't need any adjustments.
See example 1 above for more options to adjust the mesh origin.
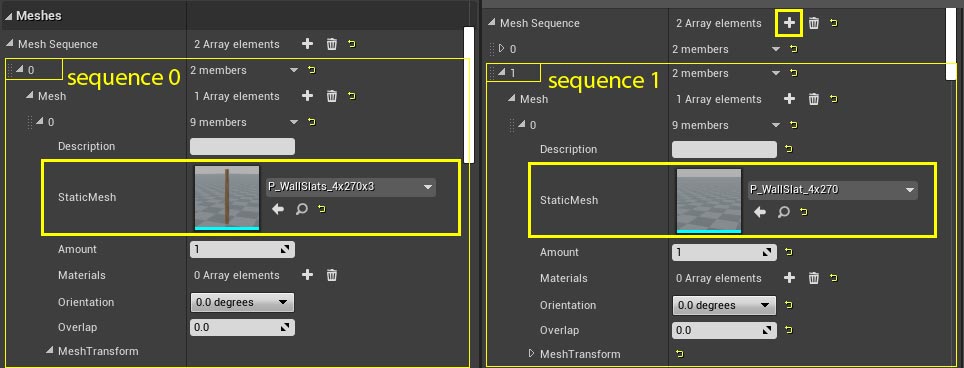
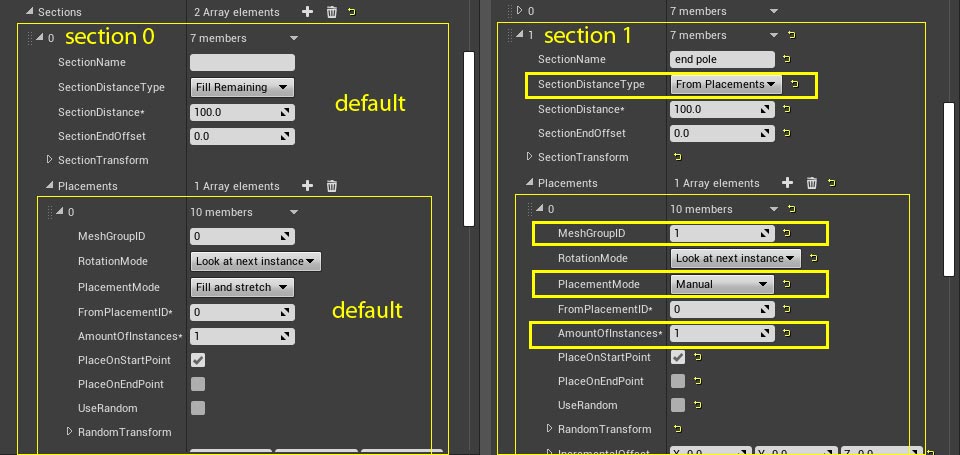
Sections Settings
Section [0] has the repeating mesh. Everything is already set up correctly by default.
Section [1] will contain the end mesh with a single slat and no black wall strip attached to end the spline placement. Set the 'SectionDistanceType' to 'From Placement'. This will take the space needed by the placement settings for this mesh.
- Placement settings:
- MeshGroupID = [1]
- PlacementMode = Manual
- AmountOfInstances = 1
Summary: Section 1 is set to manual and will use the space for 1 single slat mesh. Section 0 will take the rest of the space and scale the meshes to fit exactly into the available space.
Per Instance Random
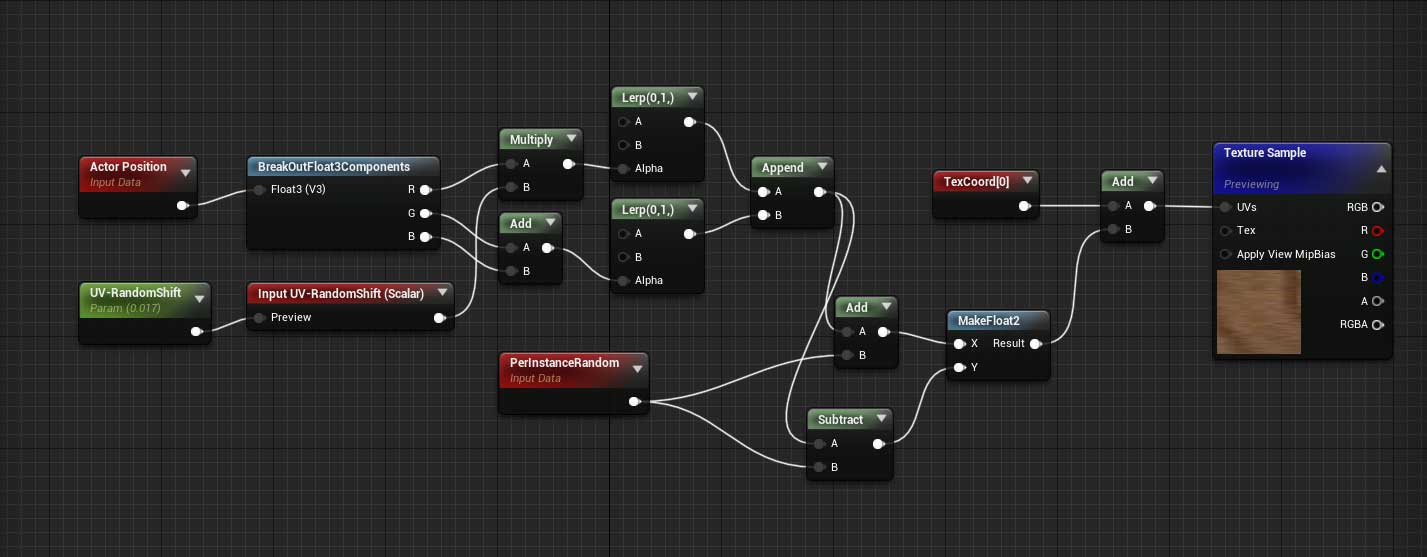
You can use this node setup in your material to avoid repetition of the texture. It randomly shifts the UVs a bit for each instance of the mesh along the spline.Just plug it into the UVs of the textures and use that material for the meshes in the spline.
Video Tutorial
Watch a 3 minute video recorded while I was creating a few slat sections in a project.
Example 3: Row of Bushes
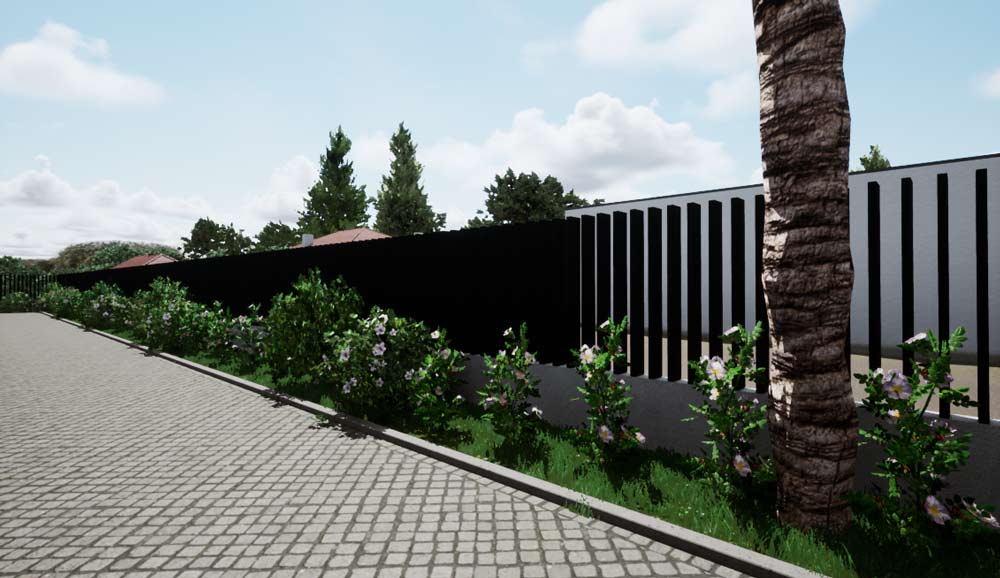
This example creates are random looking row of bushes on a small strip of soil along a driveway.
It uses a sequence of 3 bushes with random transforms and the gaps between the meshes are increased.
The scene and the bushes are not included. Those are speed tree bushes.
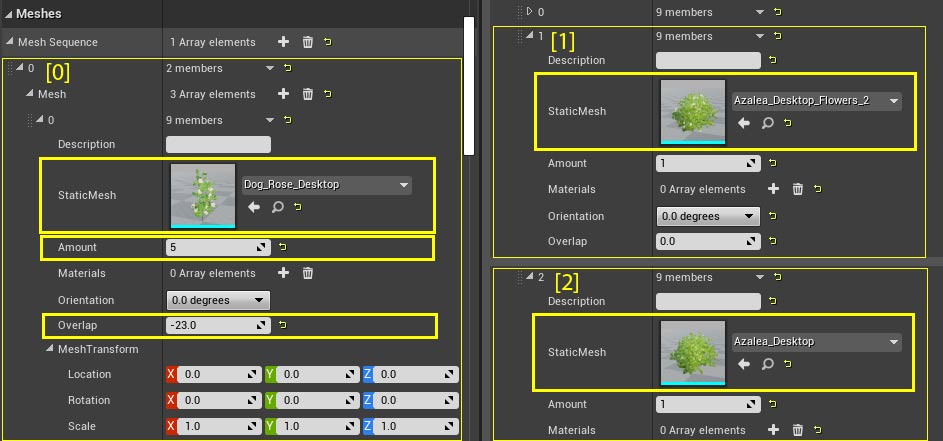
Mesh Sequence
There are 3 meshes used. A smaller bush repeated 5 times and 2
types of larger bushes placed once each. Then it repeats:
0-0-0-0-0-1-2-0-0-0-0-0-1-2-...
Place all meshes into the first Mesh Sequence [0]. Add 3 Meshes as seen on the right.
For the first mesh [0] the Amount is set to 5 and the Overlap to -23. The mesh will be repeated 5 times with a extra gap of 23 units. Negative overlaps will cause a gap.
The 2nd mesh [1] and the 3rd mesh [2] are only used once and they don't have an extra gap larger than their bounding box.
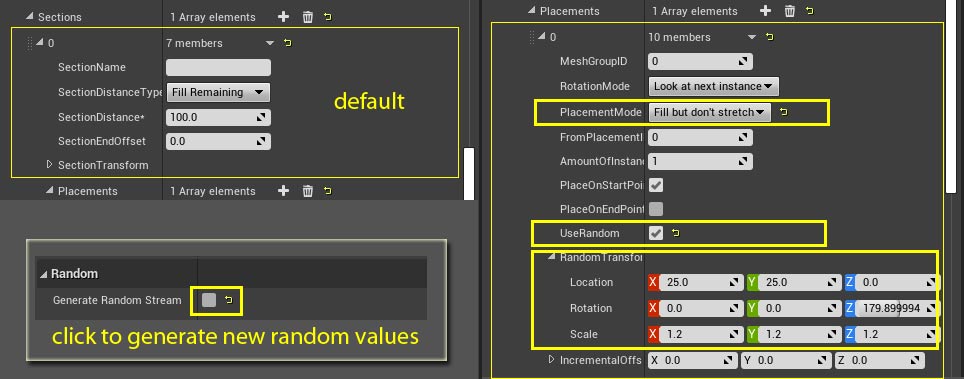
Section
There is only one section used for this. All section settings are default.
Set the PlacementMode to 'Fill but don't stretch' so meshes are not stretched along the spline.
To get random placement offsets activate the 'UseRandom' tick box. Default values should be good for most cases. You can tweak them in 'RandomTransform'. A location value of 25 in X will place the mesh randomly between +25 and -25 from the default point.
Clicking on the tick box 'Generate Random Stream' will re- generate a new stream of random values. Use this if you are not happy with the randomness.
Video Tutorial
Watch a 5 minute video recorded while I was creating this planting improving it till it works well for the scene.
Example 4: Rows of Chairs
In this example I'm placing chairs in multiple rows for the audience of an event. It uses a bit of a random placement. It has multiple sections and shows how to use 2 sets on the same spline to offset every 2nd row of chairs.The example chair is not included but it works with any chair.
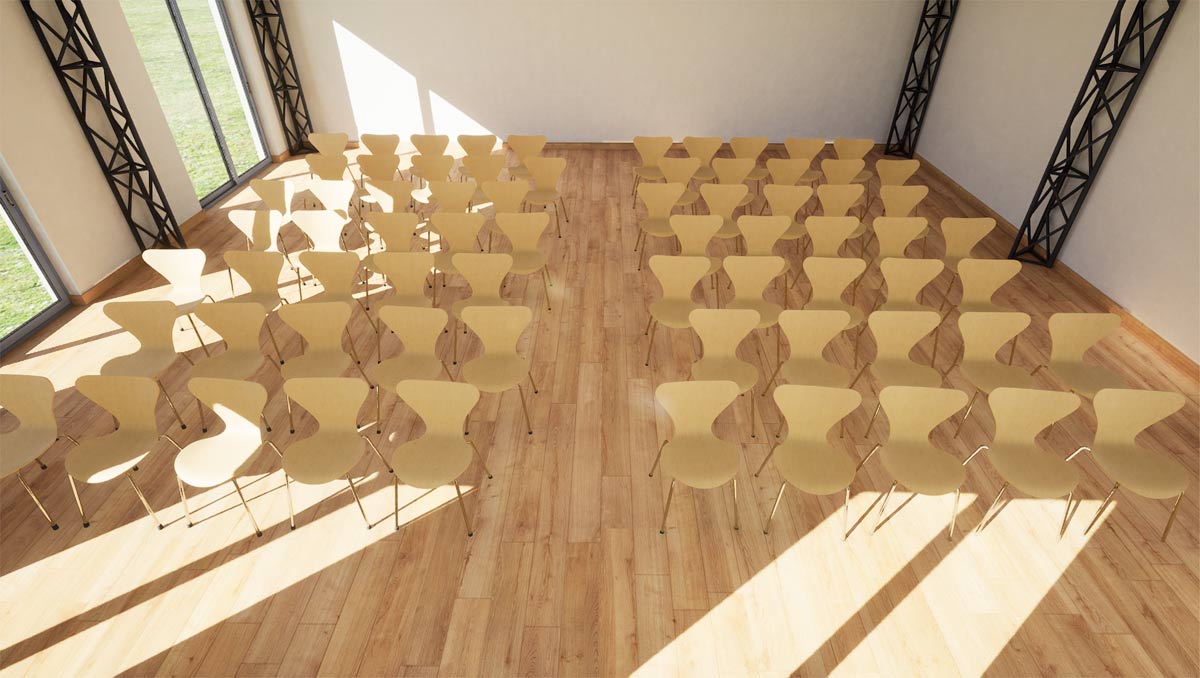
Chairs Section
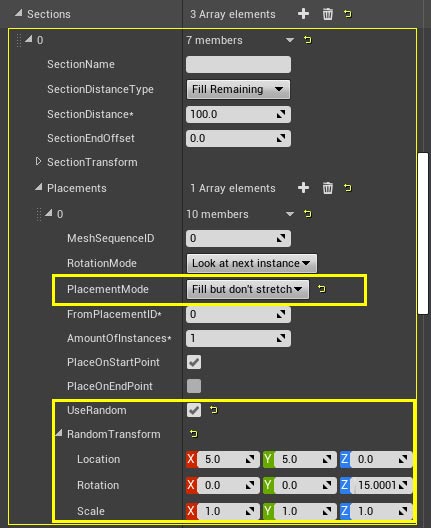
The section that contains the chairs has its default settings. 'Fill Remaining' means that the section will grab whatever space is left. The 'SectionDistance' is used as a weight value in case there are more than one sections set to 'Fill Remaining'. If one section's distance is set to 100 and the other to 50 then the first section will get 2/3 of the space and the 2nd section will get 1/3 of the space.Placement is set to 'Fill but don't stretch' to not scale the chairs here.
The random values offset each chair slightly and rotate them a bit.
Fixed Gap Section
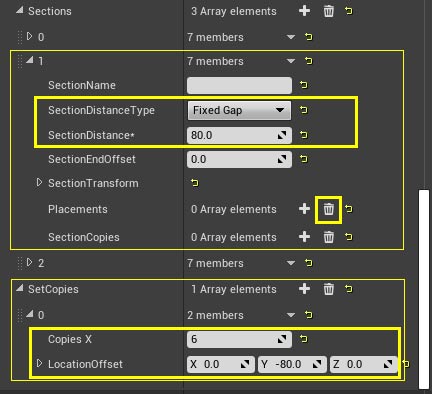
The middle section [1] is set to a fixed gap. The distance will be exactly what is set here. A gap is meant to not have any meshes. Manually remove all placements here.
Section [2] is the same as section [0]. You can copy the settings of one section to another section with the right click menu.
SetCopies can be used to copy the set placed on a spline. To get multiple rows we add an array element and set the number of copies to larger than '0'. Then adjust the Y-LocationOffset to incrementally copy the chairs.
Offsetting every 2nd row of chairs
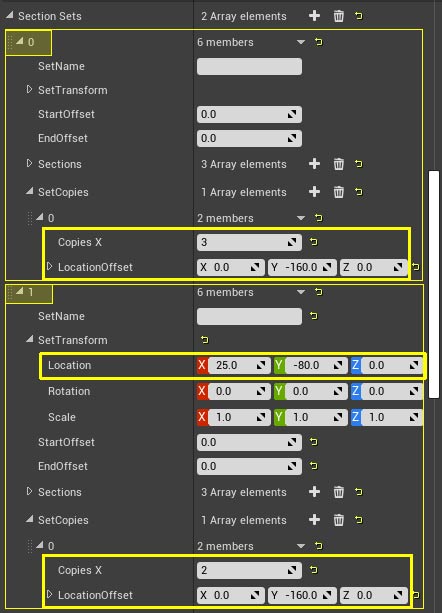
You can have more than one set of meshes along a spline. Use this feature to offset every 2nd row of chairs.
- First reduce the amount of rows to '3' in the first set and double the distance to '-160' units.
- Then add another 'Section Set' clicking on [+]
- Copy Set [0] to the new Set [1] with the right click menu.
- Use the 'SetTransform - Location' in Set [1] to offset the the chairs one row plus half a chair to the side.
- Reduce the amount of chairs in Set [1] to 2 rows.
Video Tutorial
Video recording while I am setting up this spline. Values are slightly different than the ones I used in the images above. And I didn't set the section distance to 'Fill but don't scale' in the video. Top of page