Pages in Documentation

Settings

UI3 Overview

[old] Doors UE5

Quick Start

Swap Actor

Custom Assets

System Drawings

Step by Step

Tips & FAQ

Settings

Multi-Unit-Prj

Google Data Sheets

Data Tables

Video Guides

Quick Videos

Designer

Cost Tracking

Widget Panels

Quick Guide

Scene Settings

Connect BP

VR projects

Version History

F. w. Preview
Fix Known Bugs
UI Settings

UI Layout

Gamemode

FAQ + TIPS

V4 Functions 2

V4 Functions P1

V4 Quick Guide

Ver History

V3 Placements

V3 Mesh Def.

V3 Segments

V3 Quick Start

Books V2

Books V1
Customize
Quick Guide

Swap Actor

FAQ + TIPS

Doors UE4 (V1)

3.1 Bugs Fixes

Ver History
![[2 A] Generic Meshes On Spline Blueprint ../images/architecture/0023/v2-generic/thumbs/01.jpg](../images/architecture/0023/v2-generic/thumbs/01.jpg)
V2 Generic BP
![[2 B] Generic Spline Blueprint Examples ../images/architecture/0023/v2-examples/thumbs/01.jpg](../images/architecture/0023/v2-examples/thumbs/01.jpg)
V2 Examples
![[1] Railings Clone Blueprint Documentation ../images/architecture/0023/v1/thumbs/01.jpg](../images/architecture/0023/v1/thumbs/01.jpg)
V1 Railings Fences

UI 1 - Part 1

UI 1

Ui 1 - Part 2

1 Overview

UI2 Features

UI2 Get Started

UI2 Info Map

UI2 BP Actors

UI2 User Manager

UI2 FAQ

UI2 Tutorials

UI3 Overview

Getting Started

3.1 Info Map

Variation Actor

Blueprints
UI3 Input Controls & Game Modes
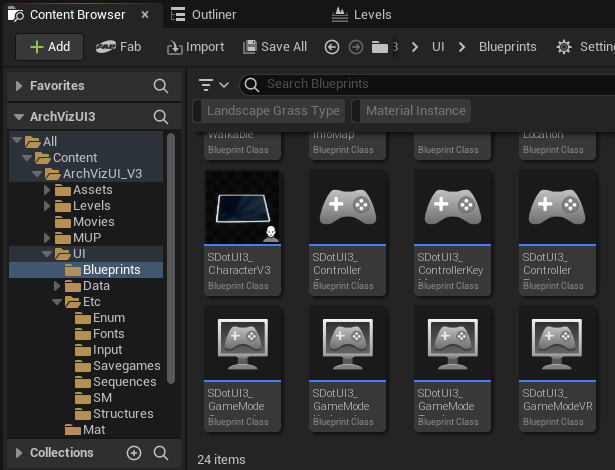
The Game Mode defines the type of game (Touch, VR) for the scene and what input devices are used to control it.
Some of the content is slightly different between versions.
Content:
SDotUI3_CharacterV3
This blueprint is part of all game modes. It contains many of the most important nodes. It also contains the movement related nodes.
SDotUI3_ControllerType
These blueprints contain the nodes for interacting with objects in the scene.
SDotUI3_GameModeType
These blueprints define which character and input controller are used in the game mode and other things.
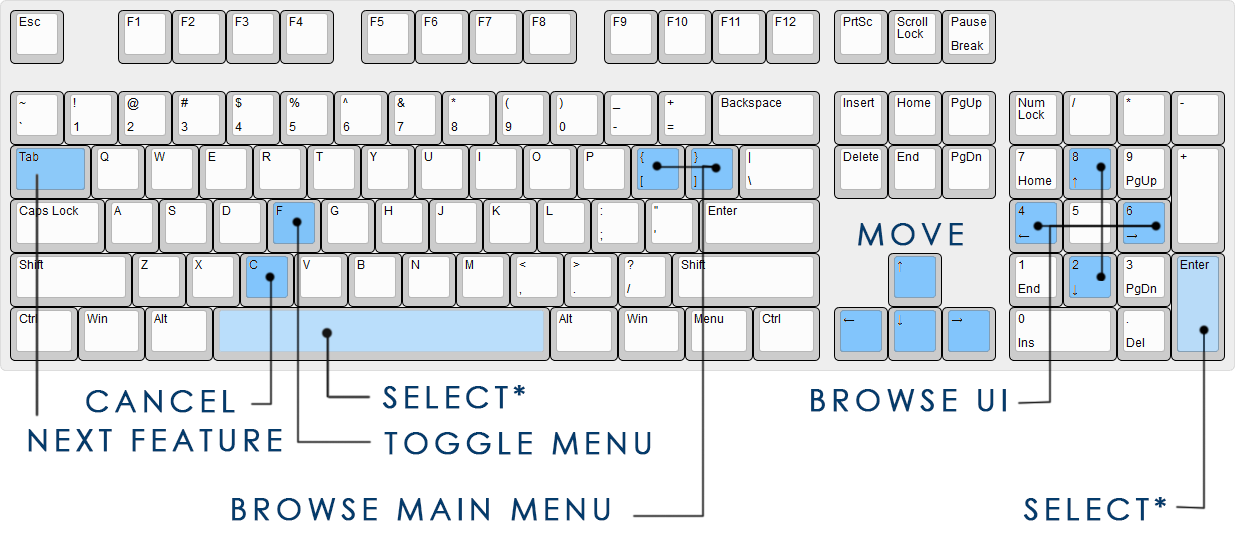
Game Mode Keyboard
SDotUI3_GameModeKeyboardGame Mode for keyboard and mouse controls. It uses
- SDotUI3_CharacterV3
- SDotUI3_ControllerKeyMouse
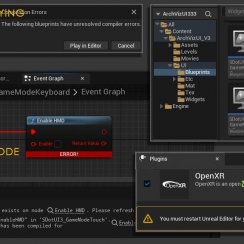
The game mode contains a node from the OpenXR plugin to disable the VR headset.

The Info Map has default settings that work well with this game mode.

Game Mode Touch
SDotUI3_GameModeTouchUse this Game Mode for touch screen devices. Also use it if you want to Pixel Stream onto a touch screen device. It uses
- SDotUI3_CharacterV3
- SDotUI3_ControllerTouch
The game mode contains a node from the OpenXR plugin to disable the VR headset.
Touch can be simulated during development with Project Settings -> Input -> Use Mouse For Touch. The simulation is buggy in recent Unreal Engine versions, but touch works fine on actual touch screens.
Note that Use Mouse For Touch will block the Mouse input in keyboard/mouse game mode.

Settings in the Info Map blueprint:
| Info Map -> Project Settings | |
| Use Mouse Move | Will be enabled automatically |
| UI Design | |
| Button Text Size | Main menu button size: 20 - increase the size from the default |
| Scene Presets | |
| > advanced display | |
| Save Slot Size | 80 x 80 - Increase the size for touch screen controls |
| Floorplan | |
| > advanced display | |
| Dot Size | 32 - Increase the size of the marker |
| Info and Help | |
| > About Project and Help | The control scheme is used as the first Info Media |
| Help Image | Use the image that shows the touch control
scheme from the Tex folder
In previous versions the help image was set as index [0] of the Info Media Array. |

Game Mode Gamepad
SDotUI3_GameModeGamepadUse this Game Mode with the XBox gamepad, Steam/VIVE, and Oculus/Quest controller.
This Game Mode uses the
- SDotUI3_CharacterV3
- SDotUI3_ControllerGamepad.
The game mode contains a node from the OpenXR plugin to toggle the VR headset.

Select may be either [SPACE] or [ENTER] in earlier versions.
Game Mode VR
SDotUI3_GameModeVRUse this Game Mode for VR scenes. It enables the 3D interface on the virtual tablet.
- SDotUI3_CharacterV3
- SDotUI3_ControllerGamepad
Grabbing or pointing at objects with your hands may not work with UI3.


Input settings (classic) for controllers
This describes the Classic Input Settings. See further down for Enhanced Input Settings (Unreal 5.3+).You can use other controllers if they are generally supported in Unreal. You may have to activate them through a plug-in, or they may become available once they are connected.
Then add their buttons to the input controls in the Project Settings. Navigate to Engine / Input and then add your controller buttons to the Bindings. This should be somewhat self-explanatory.
Action Mappings are button clicks like ENTER, or keyboard shortcuts like [I] = Screenshot.
Axis Mappings are for player movement or mouse turn.
Detailed information can be found in the Unreal Engine Documentation.

examples of how it works:
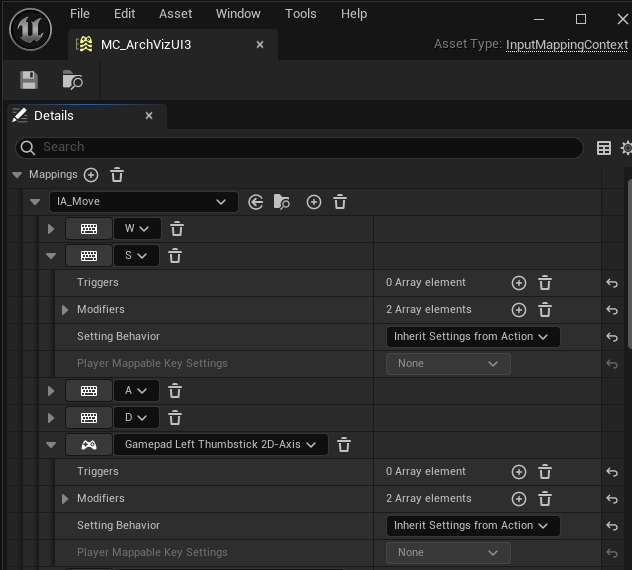
Keyboard Key S
This key controls the backwards movement. Movement is two- dimensional and can be X or Y, or forward/backward and Left/Right. You'll need 2 modifiers for this control key
- Swizzle Input Axis Values: redirects default X to direction Y which is forward/backward.
- Negate will invert (negate) the value to move backwards.
Gamepad Left Stick
The lift stick is a 2 dimensional input. There are another 2 modifiers used for this type of input:
- Dead Zone is a limiter that stops input of low values. Most controllers are not perfectly calibrated and send low values when they are idle.
- Scalar is a simple multiplier that increases the value of the stick 50 times for X and Y axis.
A simple Button, like the Select Button doesn't need any modifiers.


 Top of page
 Using VR with UI3