Pages in Documentation

Settings

UI3 Overview

[old] Doors UE5

Quick Start

Swap Actor

Custom Assets

System Drawings

Step by Step

Tips & FAQ

Settings

Multi-Unit-Prj

Google Data Sheets

Data Tables

Video Guides

Quick Videos

Designer

Cost Tracking

Widget Panels

Quick Guide

Scene Settings

Connect BP

VR projects

Version History

F. w. Preview
Fix Known Bugs
UI Settings

UI Layout

Gamemode

FAQ + TIPS

V4 Functions 2

V4 Functions P1

V4 Quick Guide

Ver History

V3 Placements

V3 Mesh Def.

V3 Segments

V3 Quick Start

Books V2

Books V1
Customize
Quick Guide

Swap Actor

FAQ + TIPS

Doors UE4 (V1)

3.1 Bugs Fixes

Ver History
![[2 A] Generic Meshes On Spline Blueprint ../images/architecture/0023/v2-generic/thumbs/01.jpg](../images/architecture/0023/v2-generic/thumbs/01.jpg)
V2 Generic BP
![[2 B] Generic Spline Blueprint Examples ../images/architecture/0023/v2-examples/thumbs/01.jpg](../images/architecture/0023/v2-examples/thumbs/01.jpg)
V2 Examples
![[1] Railings Clone Blueprint Documentation ../images/architecture/0023/v1/thumbs/01.jpg](../images/architecture/0023/v1/thumbs/01.jpg)
V1 Railings Fences

UI 1 - Part 1

UI 1

Ui 1 - Part 2

1 Overview

UI2 Features

UI2 Get Started

UI2 Info Map

UI2 BP Actors

UI2 User Manager

UI2 FAQ

UI2 Tutorials

UI3 Overview

Getting Started

3.1 Info Map

Variation Actor

Blueprints
UI3 Interface Layout Design
UI3 has a modular interface design. All menus can be created from Features and arranged with the Main Menu Layout array.
- Layout Design - how the UI is arranged
- Design Settings - text format, icon appearance, and colors.
Content:
Video Tutorial
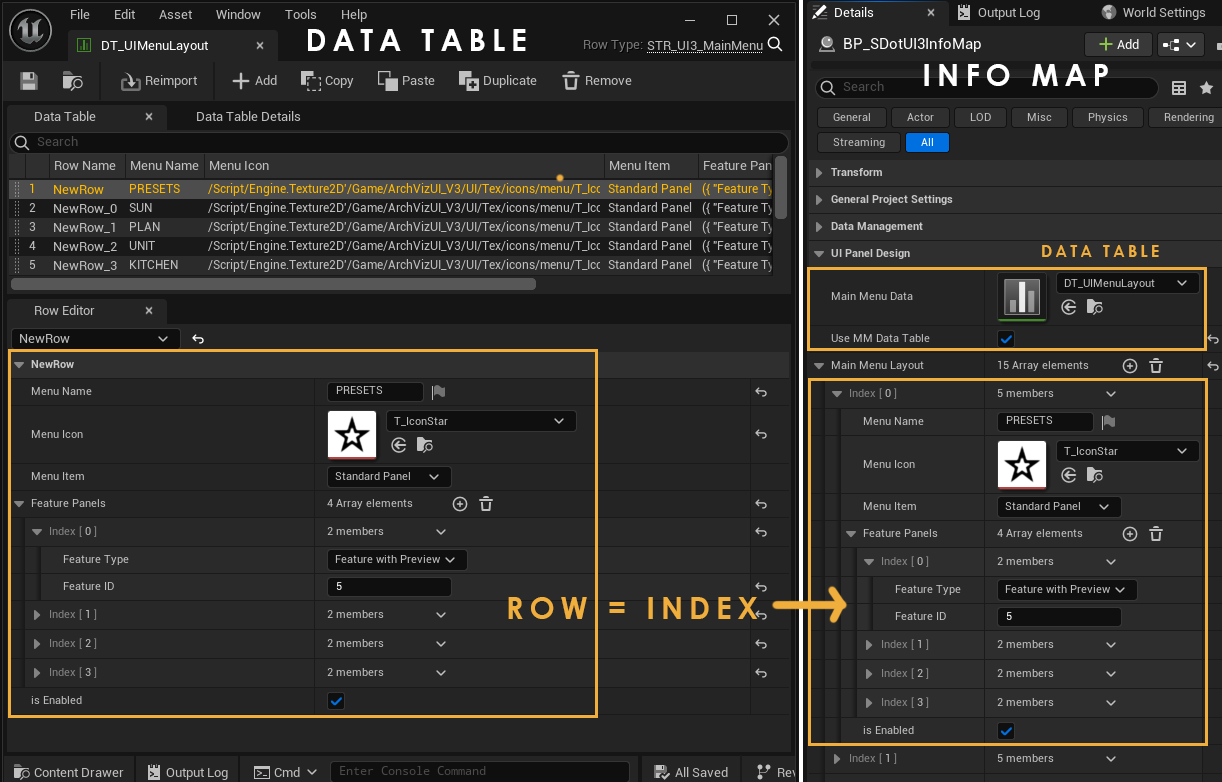
The 3rd part of the Video Tutorials is about the UI Design.A data table can be used instead of the array from mid 2025 on. This allows to share the layout settings over multiple scenes (eg. units or appartments).
A tick box use MM data table needs to be ticked to copy the settings in the data table into the array. Tick the box off and on again to transfer changes from the data table into the array.
Main Menu Buttons
Every index of the Main Menu Layout will show up as a menu item.
- click (+) to add an array element
- click and hold the dots :: to drag the element to a new position
- use the little arrows for more options.
| > Panels Design | |
| > Main Menu Layout | This array contains all the main menu items. |
| > 0 | Each array element represents one main menu button from left to right - [0] [1] [2] ... |
| Menu Icon | Use an icon that is square and black on white background. Icons are available in the UI/Tex folder, |
| Menu Name | Give the menu a name or leave it blank if you only want the icon to appear. |
| > Menu Item | Weather this is a Panel or just a button. By default every main menu is a panel. Buttons have no panels |
| > Feature Panels | This array holds the Sub Features of this Menu Button |
| isEnabled | This gives you a quick way to disable this panel. You could also delete the menu array element. |
| > Content [OLD] | This array contained the Sub Features in version 3.2.1 - this is just a backup reference. |

Feature (Sub) Panels
Sub Panels are created by adding elements to the Feature Panels array inside the array element for the Main Menu Layout.| > Feature Panels | This array holds all the Features for the main menu item. |
| > index [0] | add an array element for each feature |
| Feature Type | Select the type of the feature.
use 'Features With Previews' for - Design Schemes, Variation Groups, Scenarios - Sequence Player - Scene Travel |
| Feature ID | Some Features (Features with Preview, Custom Buttons) need an ID to tell them apart. Enter the ID here. |
| > index [1] | 2nd array element for another feature panel |
| > Content [OLD] | This array held all the Features in versions before 3.2.4. |
| Update From Old Data Force Update From Old Data |
Tries to port the Content
[OLD] array to the new Feature Panel array. As well as
creating the Features With Preview array from the
old entries for Design Schemes, Scenarios, etc. Force Update will overwrite! any new data already entered. |

Row Name = Feature ID
The old array is still in the Advanced section for references or to copy old data into the data table after an update.


 Top of page
 Video Tutorial Playlist