Table Of Content
Quick Guide

Swap Actor
Customize

FAQ + TIPS

Doors UE4 (V1)
Interactive Doors - Swap Actor
The swap actor is the bridge between a user interface and the interactive doors. It allows to change materials and door parts during a walkthrough.
Content:
Connecting The UI3 Blueprint Interface
Link Between Actors
The BP_Doors_SwapActor is the link between a widget or any other actor that controls the users input and the door blueprints.The Swap Actor receives user input from the widget via a Blueprint Interface connection.
The Swap Actor can be directly connected to one or more Doors

Connecting The UI3 Blueprint Interface
A Blueprint Interface is a very simple blueprint actor that passes on variables from one blueprint to another.ArchViz UI3 comes with the bp interface BPI_UI3_Interaction
The BP_Doors_Swap_Actor needs to be edited and the interface will be added to its Class Settings.

The list is in the Details panel of the Class Settings on the right side in default layout.
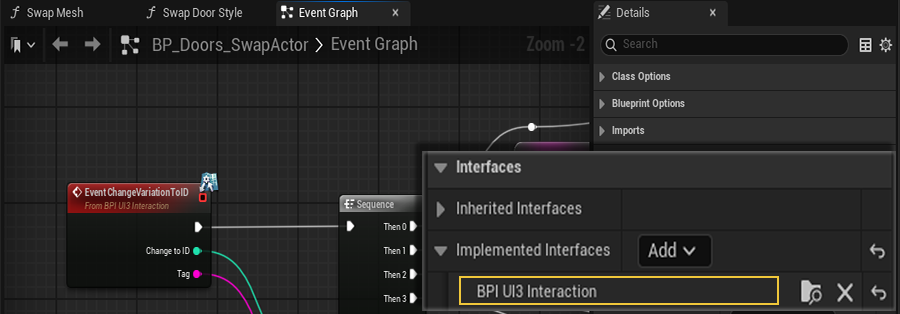
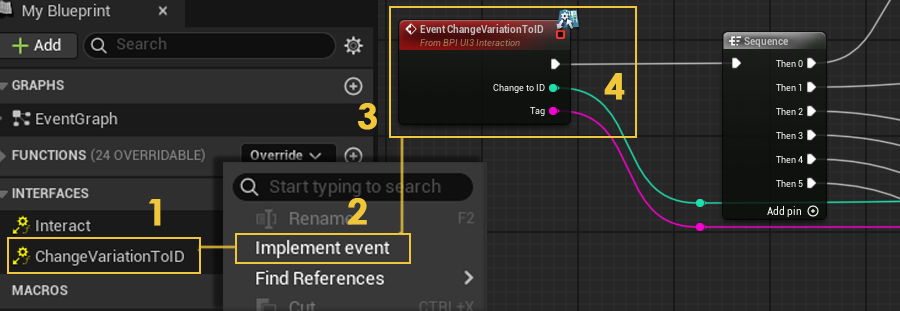
- Select the function in the Interfaces section in the My Blueprint panel on the left side.
- Right click and choose to Implement event. The function will appear in the Graph.
- Move it to the position of the function with the same name.
- Then disconnect the pins of the existing function and connect them to the new function instead.
The old function can be deleted.
Compile and Save the Swap Actor to complete the connection.
Connecting Swap Actor and Door
MyProject / Content / DoorsBPV2 / Blueprints / BP_Doors_SwapActor
Place the Swap Actor next to the door and then use the eyedropper to connect one or more door blueprint actors.
Both Swap Actor and Door need to be in the same level.
All connected doors will change together.

Style Variations
- Click the relevant (+) icon next to the style's name for each variation choice.
- Then select the choice from the dropdown list.
- Give the style a Tag name.
The Tag and the variation ID will be sent from the widget. Every option with the same tag name will change. All options will change at once if they have the same tag name or individually if they have unique names.

Material Variations
- Click the (+) icon to add a Material Variation
- Add one or more Parts that should change to the new material
- Click the (+) icon next to Variations for each material ID that should be changed
- Enter the material ID number
- Add the Materials per Choice ID.
- Add a Tag name as described for style changes.

Controller Connection in the Demo Level
The Door Blueprints and the Player Controller are connected through the BPI_Doors_Interaction blueprint interface. The interface has no code in it. It just routes one actor to another actor with empty functions. Blueprints / Other / BP_DoorController
Interaction
The controller calls the Interact function in all blueprints with the same interface if the [R] key is clicked.
The door blueprints then check if the player is within the trigger box and open the door.
Variation
The keys [1] to [6] will call the Set Variation function and send the tag and choice ID to any blueprint that has the blueprint interface assigned.
The blueprints with the interface then look at the tag name and set the choice if the tag name is the correct one.

 Top of page