Table Of Content

Quick Start

Settings

System Drawings

Swap Actor

Custom Assets

Tips & FAQ

Step by Step

Ver History
Kitchen Builder - Swap Actor
The BP_KitchenBuilder_SwapActor is the link between the User Interface and the Kitchen Builder blueprint.
It allows the user to make changes to the kitchen style and materials in run-time.
Content:
Connecting The UI3 Blueprint Interface
Link between Actors
The BP_Kitchen_SwapActor is the link between a widget or any other actor that controls the users input and the door blueprints.The Swap Actor receives user input from the widget via a Blueprint Interface connection.
The Swap Actor can be directly connected to one or more Kitchen Blueprints

Connecting The UI3 Blueprint Interface
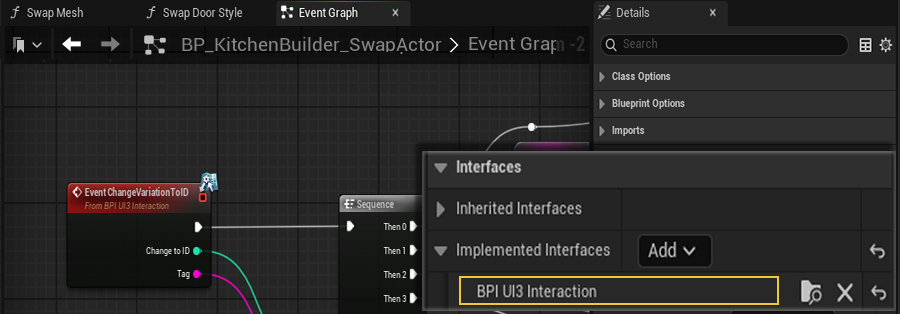
A Blueprint Interface is a very simple blueprint actor that passes on variables from one blueprint to another.ArchViz UI3 comes with the bp interface BPI_UI3_Interaction
The BP_Kitchen_Swap_Actor needs to be edited and the interface will be added to its Class Settings.

The list is in the Details panel of the Class Settings on the right side in default layout.

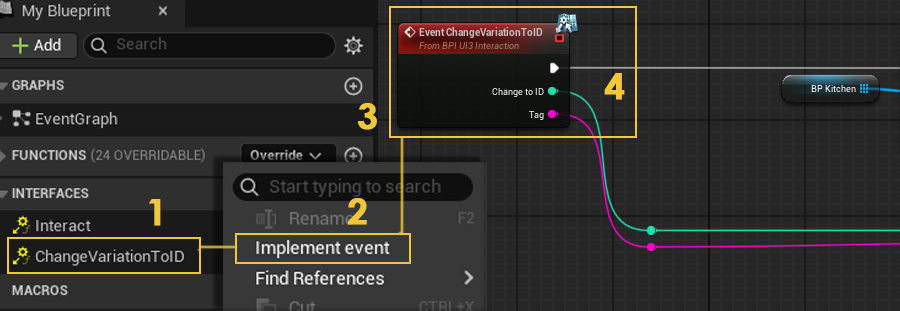
- Select the function in the Interfaces section in the My Blueprint panel on the left side.
- Right click and choose to Implement event. The function will appear in the Graph.
- Move it to the position of the function with the same name.
- Then disconnect the pins of the existing function and connect them to the new function instead.
The old function can be deleted.
Compile and Save the Swap Actor to complete the connection.

Connecting Swap Actor and Kitchen
MyProject / Content / KitchenBuilder / Blueprints / BP_KitchenBuilder_SwapActor
Place the Swap Actor next to the kitchen and then use the eyedropper to connect one or more kitchen builder blueprint actors.
Both Swap Actor and kitchen blueprint need to be in the same level.
All connected kitchens will change together.

Material Variations
- Click the (+) icon to add a Material Variation
- Add one or more Material Types that should change to the new material
- Click the (+) icon next to Material Variations to Material Variations.
- Add a Tag name to identify the Material Variation.
The widget or blueprint will send the Tag name with the ID. The swap actor checks the Tag name and if it's the same it will change the Material Types to the new material with the ID.

Style Variations
Cabinet Styles
Cabinet Front Style, Crown Style and Kick Style can be changed independently or together if they have the same Tag name.
- Click the relevant (+) icon next to the style's name for each variation choice.
- Then select the choice from the dropdown list.
- Give the style a Tag name as explained above.

Handle Styles
Handle Style for doors and drawers can be changed independently or together if they have the same Tag name.
Setting a choice index to "None" will remove the handles.
- Click the relevant (+) icon next to the style's name for each variation choice.
- Then select the choice from the dropdown list.
- Give the style a Tag name as explained above.

 Top of page