Table Of Content

Quick Guide

Video Guides

Getting Started
UI Settings

Data Tables

UI Layout

Widget Panels

F. w. Preview

Designer

Variation Actor

Scene Settings

Blueprints

Gamemode

VR projects

Connect BP

Cost Tracking

Multi-Unit-Prj

Google Data Sheets

FAQ + TIPS
Fix Known Bugs

Version History
Connect UI3 To External Blueprints
How to connect to other blueprints that are not part of the UI3 project.
- Modular Kitchen Builder Blueprint
- Interactive Door Blueprint
- Switchable Lights
- Ultra Dynamic Sky
- File Plugins
Content:
Connect Blueprints to UI3 With Blueprint Interface
Video Tutorial for UDS and EFM
Ultra Dynamic Sky - Quick Guide
Connect Blueprints to UI3 With Blueprint Interface
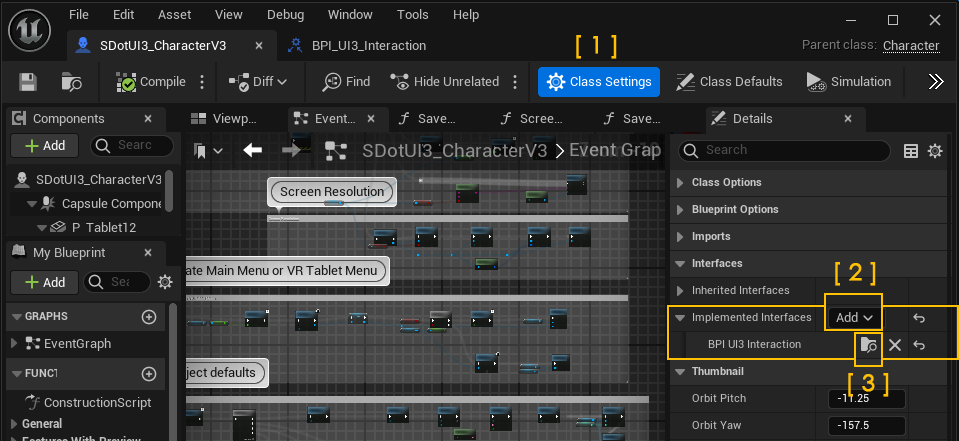
External Blueprints can be connected with the Blueprint interface ArchVizUI_V3 / UI / Etc / BPI_UI3_Interaction.The SDotUI3_CharacterV3 has it already implemented.
To implement the interface
- Click on the Class Settings
- Click on Add in the Implemented Interfaces section in the Details panel and Select the blueprint interface BPI_UI3_Interaction.
- Check the location of the selected interface. It has to be the one in ArchViz/UI/Etc.
Ceiling Fan Example
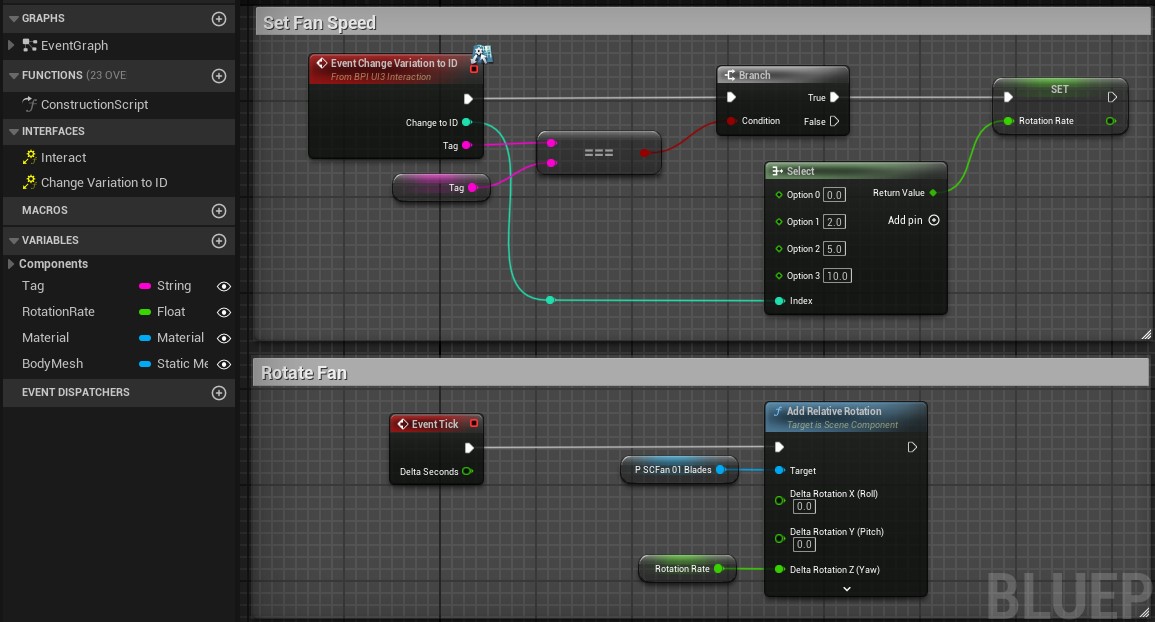
The Ceiling Fan is a simple blueprint that allows its speed being changed from within the UI3.
The Ceiling Fan has a Tag to identify the blueprint. This name will be called from the Variation Actor.

Blueprint Interface Functions
Right click the Change Variation To ID in the Interfaces section on the left side panel and choose Implement event.
The Event will be placed in the Events panel and needs to be connected to the Set Fan Speed white section nodes.
The Blueprint listens to the interface. It changes the Rotation Rate variable if the Tag that is sent is the same as the one set for this Fan.
The blueprint adds a bit of rotation every Tick. A Tick happens every frame. The variable sets the rotation rate that is added. Setting the rotation rate to 0.0 will stop the fan.
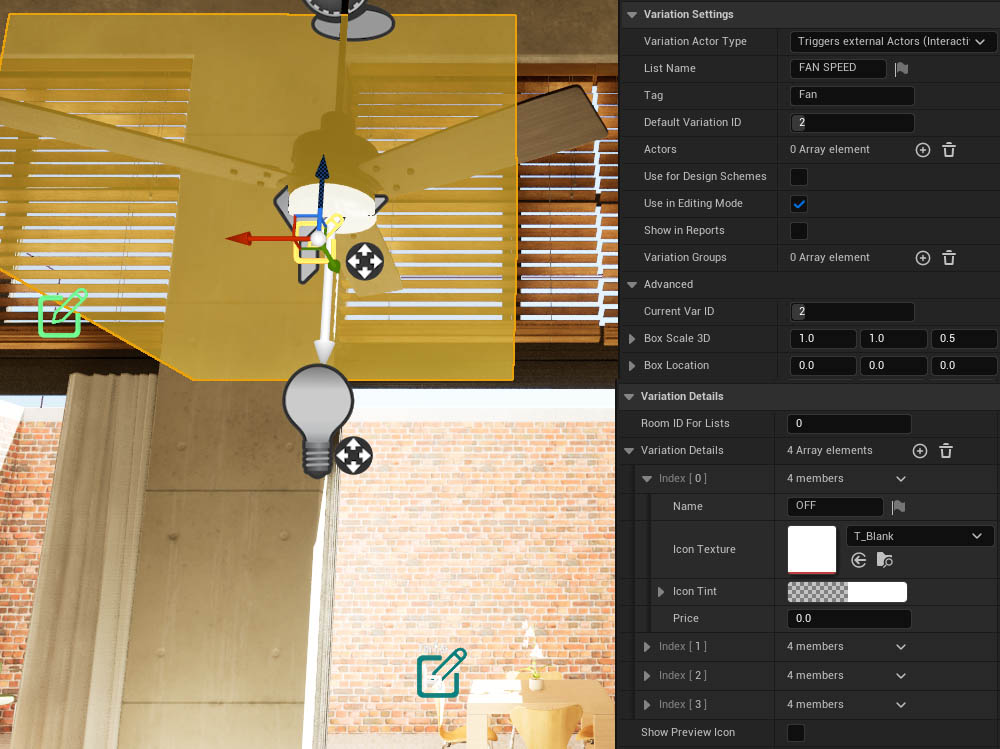
Variation Actor for Fan
Variation Actor Type is set to Triggers external Actors (Interactive. This setting will enable the yellow collision box. The size and offset can be set in the Advanced Settings.The collision box will make the Variation actor selectable, as no mesh is directly connected to it.
The Tag name needs to be identical to the Tag set in the Fan blueprint.
Only the Name needs to be set in the Variation Details and Show Preview Icon can be disabled.
Interactive Door Blueprint
The Modular Kitchen Builder uses a swap actor between the kitchen and the UI3. Connect the blueprint interface to the BP_Doors_SwapActor.More Info is available in the documentation for the Doors Blueprint.
Variation Actors or the Designer can be used to make changes to the Interactive Doors Blueprint.

Modular Kitchen Builder
The Modular Kitchen Builder uses a swap actor between the kitchen and the UI3. Connect the blueprint interface to the BP_KitchenBuilder_SwapActor.More Info is available in the documentation for the Kitchen Builder.
Variation Actors or the Designer can be used to make changes to the Modular Kitchen Builder.

Light Switch Example
This is the blueprint setup for the toggle light added in the Tutorial Video.- Add the BPI_UI3_Interaction interface to the class settings
- Implement the Change Variation to ID into the graph
- Set the same Tag name in blueprint and Variation Actor
The blueprint uses a Switch on INT node to execute different actions depending on the Variation IDs received.

Video Tutorial for UDS and EFM
This video tutorial explains how to connect the Ultra Dynamic Sky and the Easy File Manager to the interface.Ultra Dynamic Sky - Quick Guide
- Remove any sky box items like: directional light, skylight, fog, clouds, sky atmosphere.
- Place the UDSky blueprint at ground level in your scene.
- Set the time in the top settings section.
- Browse down to Simulation and change the following settings:
| > Simulation | |
| Simulate Real Sun Simulate Real Moon Simulate Real Stars |
Tick all three simulation boxes |
| Location Preset | Set your project location from the Preset List, if available |
| Latitude Longitude |
Or set the location values manual here |
| Year | Month | Date | Set the current date as a starting point |
| North Yaw | This will rotate the sun to line up with the real sun position |
The Ultra Dynamic Sky can be used the same way as the default Sun Sky in the widget.

Functions
There are 2 functions you will have to change. They are
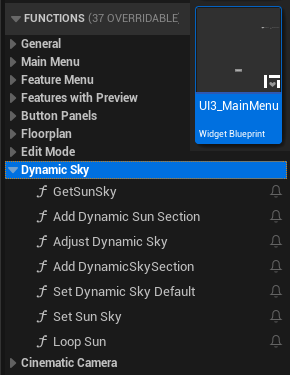
- either in the UI3_MainMenu widget. It's in the UI/Widgets folder.
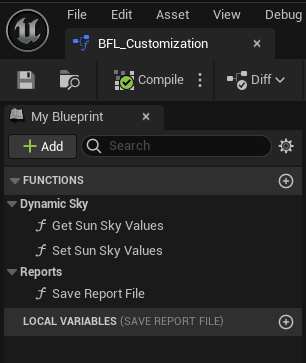
- or in the BFL_Customization Library in the UI/Blueprints Folder
Find and open the widget or library. Look for the 2 functions Get Sun Sky and Set Sun Sky.
Get Sun Sky [Function]
- Change the drop down Actor Class to search for all Ultra Dynamic Sky blueprints. Disconnect the Result Pin, compile and the reconnect the Result Pin to Set and Is Valid.
- Cast to the Ultra_Dynamic_Sky instead of the SunSky
- Get the variable Time of Day from it and divide it by 100. Plug the result into the Solar Time of the Return Node.
- Get the function Get Date Time, Break the Date Time and plug the Day and Month into the Return Node.
- Compile and Save the Widget.

Set Sun Sky [Function]
- Change the drop down Actor Class to search for all Ultra Dynamic Sky blueprints. Disconnect the Result Pin, compile and the reconnect the Result Pin to Set and Is Valid.
- Cast to the Ultra_Dynamic_Sky instead of the SunSky
- Get the function Time of Day to H/M/S from it. Multiply the Solar Time Input with 100 and plug the result into the Time pin.
- Get the function Set Date Time from the Ultra_Dynamic_Sky. and plug a Make Date Time node into its Date Time pin.
- Set the Year of the Make Date Time node to 2024. Use the Input pins for Day and Month, and the Hour, Minute, Second from the Output pins of the Time of Day to H/M/S node.
- Compile and Save the Widget.

Save Reports with Blueprint FileSDK
This free plugin lets you print files from the UI3 to a local drive.- Get the plugin from FAB
- Add it to your engine version
- Enable it in your project
- Open the blueprint library BFL_Customization
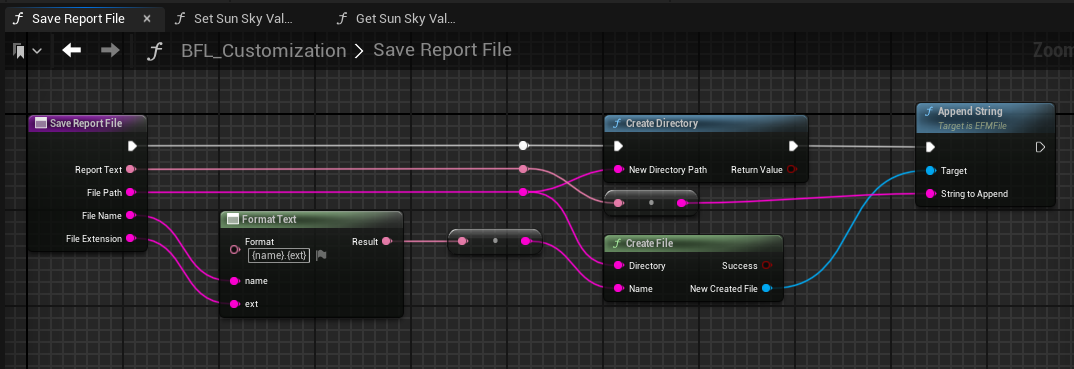
- Modify the function Save Report File as seen in the image.
The user manager widget will show you the save directory. By default it is MyPrj / Saved.

Save Files - Easy File Manager Plugin
The Easy File Manager plugin from the marketplace can save reports created with the UI3. There might be other plugins that can do the same.Version 2024-06 or later
Open UI / Blueprints BFL_Customization function library and complete the Save Report File function.
This function library can be backed up and recovered in case an UI3 update would revert your changes.
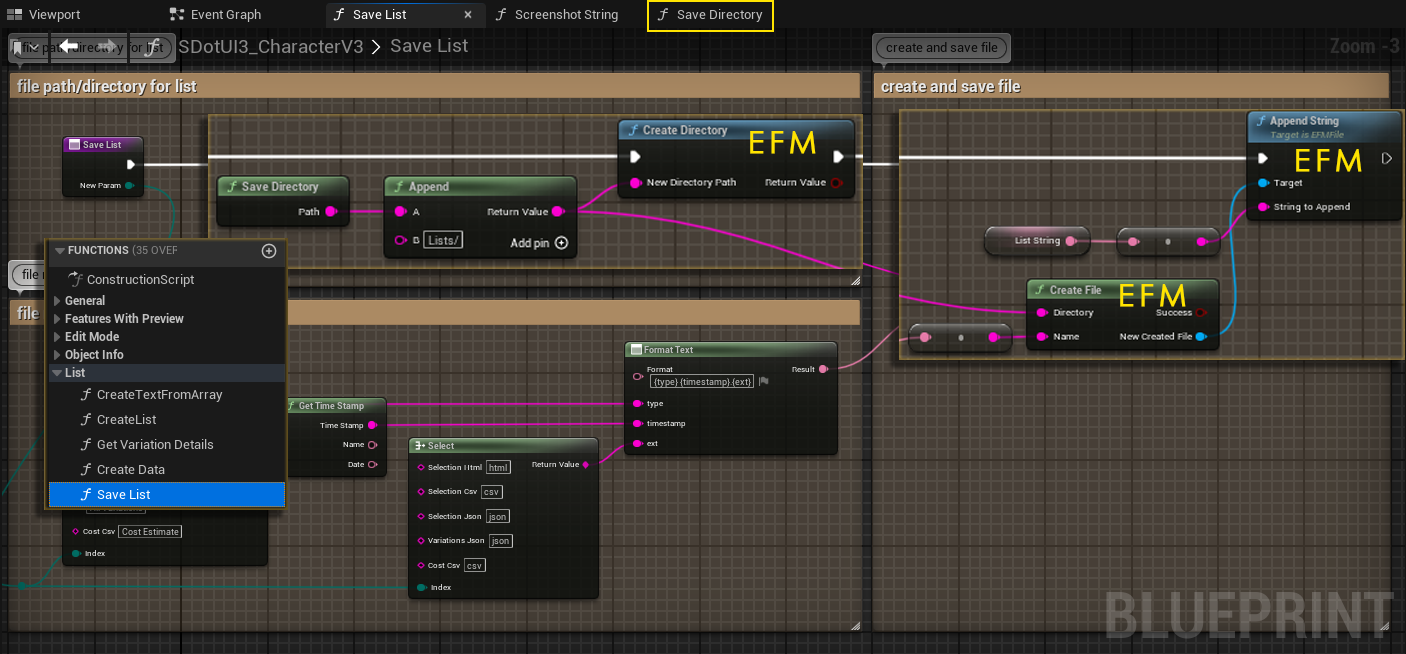
Version 2024 02-06
- Open the SDOTUI3_CharacterV3 from the blueprint directory.
- Go to the function Save List
- Add the nodes marked EFM to the blueprint and connect the nodes as seen in the image.
- Compile and save the character blueprint.
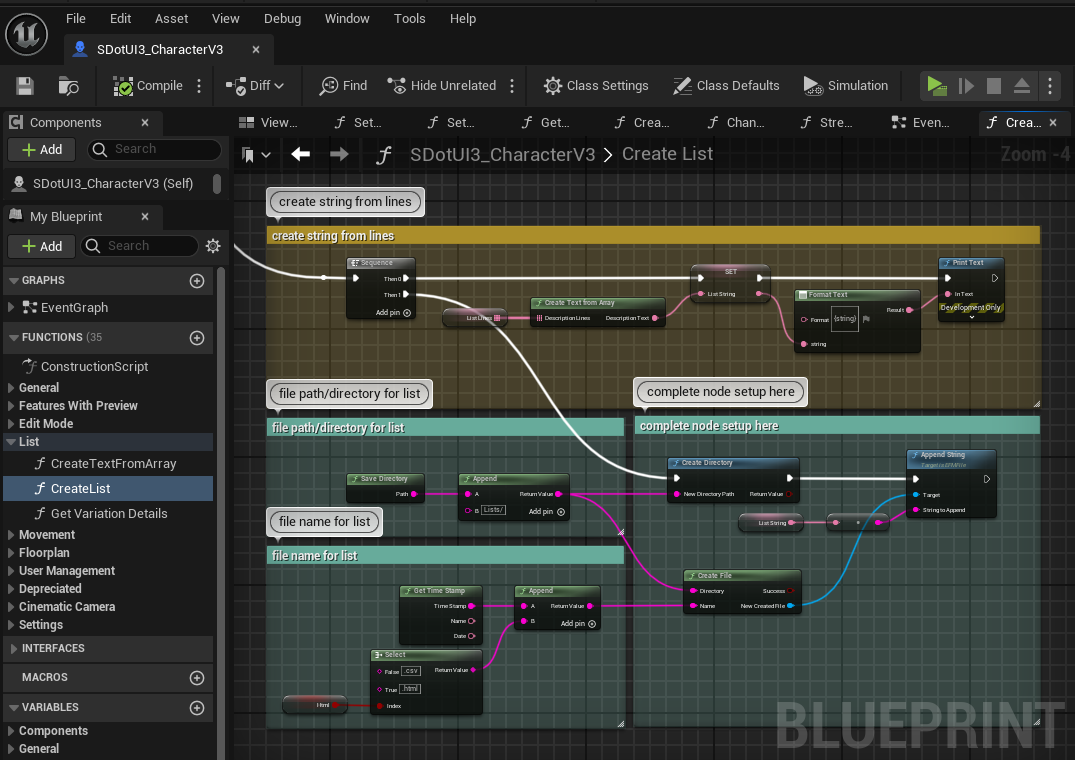
Earlier Versions
- Open the SDOTUI3_CharacterV3 from the blueprint directory.
- Go to the function Create List
- Go to the bottom of the graph nodes and connect the nodes as seen in the image.
- Compile and save the character blueprint.
 Top of page
 Interactive Doors Documentation
 UI3 Scene Settings